 springCache配合redis做缓存
# springCache配合redis做缓存
# redis的优势
我们都知道redis可以作为缓存,是因为它具有
- 大内存作为缓存
- redis的缓存可以被持久化
- redis可以实现分布式缓存
- Redis可以处理每秒百万级的并发,是专业的绶存服务
- redis对缓存有过期时间机制
- Redis不仅仅支持简单的k/v类型的数据,同时还提供list,set,zset,hash等数据结构的存储。
# 什么是springCache
# 概述
Spring 3.1 引入了激动人心的基于凝视(annotation)的缓存(cache)技术,它本质上不是一个具体的缓存实现方案(比如EHCache 或者 OSCache),而是一个对缓存使用的抽象,通过在既有代码中加入少量它定义的各种 annotation,即能够达到缓存方法的返回对象的效果。
其特点总结例如以下:
- 通过少量的配置 annotation 凝视就可以使得既有代码支持缓存
- 支持开箱即用 Out-Of-The-Box,即不用安装和部署额外第三方组件就可以使用缓存
- 支持 Spring Express Language,能使用对象的不论什么属性或者方法来定义缓存的 key 和 condition
- 支持 AspectJ,并通过事实上现不论什么方法的缓存支持
- 支持自己定义 key 和自己定义缓存管理者,具有相当的灵活性和扩展性
# 组成部分
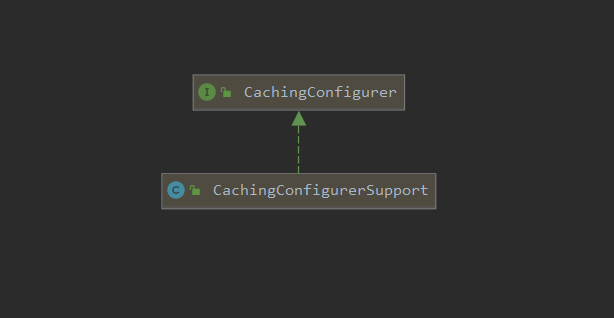
首先,我们可以知道 他有一个CachingConfigurer接口和 实现此接口的CachingConfigurerSupport实现类。
接口CachingConfigurer的方法:
CacheManager cacheManager() 返回缓存管理器bean,以用于注释驱动的缓存管理。默认的
CacheResolver将使用此缓存管理器初始化。为了更精细地管理缓存,请考虑直接设置CacheResolverCacheResolver cacheResolver() 以用于解析由注释驱动的缓存管理的常规缓存。这是指定要使用的
CacheManager的替代方法,功能更强大KeyGenerator keyGenerator() 返回密钥生成器bean,以用于注释驱动的缓存管理。 实现必须明确声明
CacheErrorHandler errorHandler 返回
CacheErrorHandler以处理与缓存相关的错误。默认情况下,使用SimpleCacheErrorHandler并简单地将异常返回给客户端
我们可以设置redis作为缓存提供者
# @Cacheable、@CachePut、@CacheEvict 注释介绍
@Cacheable 的作用 主要针对方法配置,能够根据方法的请求参数对其结果进行缓存
@Cacheable 主要的参数 value缓存的名称,在 spring 配置文件中定义,必须指定至少一个例如:
@Cacheable(value=”mycache”) 或者
@Cacheable(value={”cache1”,”cache2”}key缓存的 key,可以为空,如果指定要按照 SpEL 表达式编写,如果不指定,则缺省按照方法的所有参数进行组合例如:
@Cacheable(value=”testcache”,key=”#userName”)condition缓存的条件,可以为空,使用 SpEL 编写,返回 true 或者 false,只有为 true 才进行缓存例如:
@Cacheable(value=”testcache”,condition=”#userName.length()>2”)
@CachePut 的作用 主要针对方法配置,能够根据方法的请求参数对其结果进行缓存,和 @Cacheable 不同的是,它每次都会触发真实方法的调用
@CachePut 主要的参数 value缓存的名称,在 spring 配置文件中定义,必须指定至少一个例如:
@CachEvict 的作用 主要针对方法配置,能够根据一定的条件对缓存进行清空
@CacheEvict 主要的参数 value缓存的名称,在 spring 配置文件中定义,必须指定至少一个例如:
@CachEvict(value=”mycache”) 或者
@CachEvict(value={”cache1”,”cache2”}key缓存的 key,可以为空,如果指定要按照 SpEL 表达式编写,如果不指定,则缺省按照方法的所有参数进行组合例如:
@CachEvict(value=”testcache”,key=”#userName”)condition缓存的条件,可以为空,使用 SpEL 编写,返回 true 或者 false,只有为 true 才清空缓存例如:
@CachEvict(value=”testcache”,
condition=”#userName.length()>2”)allEntries是否清空所有缓存内容,缺省为 false,如果指定为 true,则方法调用后将立即清空所有缓存例如:
@CachEvict(value=”testcache”,allEntries=true)beforeInvocation是否在方法执行前就清空,缺省为 false,如果指定为 true,则在方法还没有执行的时候就清空缓存,缺省情况下,如果方法执行抛出异常,则不会清空缓存例如:
@CachEvict(value=”testcache”,beforeInvocation=true)
@CacheConfig:主要用于配置该类中会用到的一些共用的缓存配置
所有的@Cacheable()里面都有一个value=“xxx”的属性,这显然如果方法多了,写起来也是挺累的,如果可以一次性声明完 那就省事了, 所以,有了@CacheConfig这个配置,@CacheConfig is a class-level annotation that allows to share the cache names,如果你在你的方法写别的名字,那么依然以方法的名字为准。
@CacheConfig是一个类级别的注解。
/** * 测试服务层 */
@Service
@CacheConfig(value = "taskLog")
public class TaskLogService {

    @Autowired  private TaskLogMapper taskLogMapper;
    @Autowired  private net.sf.ehcache.CacheManager cacheManager;

    /** * 缓存的key */
    public static final String CACHE_KEY   = "taskLog";

    /** * 添加tasklog * @param tasklog * @return */
    @CachePut(key = "#tasklog.id")
    public Tasklog create(Tasklog tasklog){
        System.out.println("CREATE");
        System.err.println (tasklog);
        taskLogMapper.insert(tasklog);
        return tasklog;
    }

    /** * 根据ID获取Tasklog * @param id * @return */
    @Cacheable(key = "#id")
    public Tasklog findById(String id){
        System.out.println("FINDBYID");
        System.out.println("ID:"+id);
        return taskLogMapper.selectById(id);
    }
}
2
3
4
5
6
7
8
9
10
11
12
13
14
15
16
17
18
19
20
21
22
23
24
25
26
27
28
@Caching:配置于函数上,组合多个Cache注解使用。
有时候我们可能组合多个Cache注解使用;比如用户新增成功后,我们要添加id–>user;username—>user;email—>user的缓存;此时就需要@Caching组合多个注解标签了。
@Caching(put = {
@CachePut(value = "user", key = "#user.id"),
@CachePut(value = "user", key = "#user.username"),
@CachePut(value = "user", key = "#user.email")
})
public User save(User user) {
}
2
3
4
5
6
7
# demo 搭建
# 1. 配置缓存配置类
这里使用的时spring-boot2.x版本
@Configuration
@EnableCaching
class RedisCacheConfig extends CachingConfigurerSupport{

    /**
     * 自定义缓存key生成策略
     */
    @Override
    @Bean
    public KeyGenerator keyGenerator() {
        return new KeyGenerator() {
            @Override
            public Object generate(Object target, java.lang.reflect.Method method, Object... params) {
                StringBuffer sb = new StringBuffer();
                sb.append(target.getClass().getName());
                sb.append(method.getName());
                for (Object obj : params) {
                    sb.append(obj.toString());
                }
                return sb.toString();
            }
        };
    }


        /**
         * 缓存管理器
         */
        @Bean
        public CacheManager cacheManager(RedisConnectionFactory redisConnectionFactory) {
            RedisCacheConfiguration redisCacheConfiguration = RedisCacheConfiguration.defaultCacheConfig()
                    .entryTtl(Duration.ofSeconds(30)); // 设置缓存有效期30s
            return RedisCacheManager
                    .builder(RedisCacheWriter.nonLockingRedisCacheWriter(redisConnectionFactory))
                    .cacheDefaults(redisCacheConfiguration).build();
        }

    @Bean
    public RedisTemplate<String, Object> redisTemplate(
            RedisConnectionFactory connectionFactory) {
        RedisTemplate<String, Object> redisTemplate = new RedisTemplate<String, Object>();
        redisTemplate.setConnectionFactory(connectionFactory);
        redisTemplate.setDefaultSerializer(new GenericJackson2JsonRedisSerializer());
        StringRedisSerializer stringRedisSerializer = new StringRedisSerializer();
        redisTemplate.setKeySerializer(stringRedisSerializer);
        redisTemplate.setHashKeySerializer(stringRedisSerializer);
        return redisTemplate;
    }

     /* springboot 1.0 搭法
    @Bean
    public RedisTemplate<Object, Employee> empRedisTemplate(RedisConnectionFactory redisConnectionFactory) throws UnknownHostException {
        RedisTemplate<Object, Employee> template = new RedisTemplate();
        template.setConnectionFactory(redisConnectionFactory);
        Jackson2JsonRedisSerializer<Employee> serializer = new Jackson2JsonRedisSerializer<Employee>(Employee.class);
        template.setDefaultSerializer(serializer);
        return template;
    }

    @Bean
    public RedisCacheManager employeeCacheManager(RedisTemplate<Object,Employee> empRedisTemplate){
        RedisCacheManager cacheManager = new RedisCacheManager(empRedisTemplate);
        cacheManager.setTransactionAware(true);

        return cacheManager;
    }*/

}
2
3
4
5
6
7
8
9
10
11
12
13
14
15
16
17
18
19
20
21
22
23
24
25
26
27
28
29
30
31
32
33
34
35
36
37
38
39
40
41
42
43
44
45
46
47
48
49
50
51
52
53
54
55
56
57
58
59
60
61
62
63
64
65
66
67
68
# 2. service业务上 添加 对应注解
@Service
@Slf4j
public class DeviceServiceImpl extends ServiceImpl<DeviceMapper, Device> implements IDeviceService {


    /**
     *新增
     * @param device 设备实体类
     * @return
     */
    @Override
    @CachePut(cacheNames="device",key="#device.id")
    public void insert(Device device){
         save(device);
    }

    /**
     * 删除
     * @param id 主键id
     * @return
     */
    @Override
    @CacheEvict(cacheNames = "device",key = "id")
    public boolean deleteById(Long id) {
        return removeById(id);
    }

    /**
     * 更新
     * @param device
     * @return
     */
    @Override
    public Boolean updateDevice(Device device){
        boolean update = updateById(device);
        log.info("device update after : {}",device);
        return update;
    }

    /**
     * 查询全部设备
     *
     * @return
     */
    @Override
    @Cacheable(cacheNames = "device",key = "'device-'+#root.targetClass.id")
    public  List<Device> allDevices() {
        List<Device> list = list();
        return list;
    }


}
2
3
4
5
6
7
8
9
10
11
12
13
14
15
16
17
18
19
20
21
22
23
24
25
26
27
28
29
30
31
32
33
34
35
36
37
38
39
40
41
42
43
44
45
46
47
48
49
50
51
52
53
54
55
56
# 3. 测试
@RunWith(SpringRunner.class)
//SpringBoot1.4版本之前用的是@SpringApplicationConfiguration(classes = Application.class)
@SpringBootTest
public class DeviceControllerTest {

    @Autowired
    private DeviceController deviceController;

    @Test
    public void devices() {
        ResponseResult devices = deviceController.devices();
        System.out.println("devices = " + devices);
    }

    @Test
    public void saveDevice() {

        deviceController.saveDevice();
    }

    @Test
    public void deleteDevice() {

        deviceController.deleteDevice(60L);
    }
}
2
3
4
5
6
7
8
9
10
11
12
13
14
15
16
17
18
19
20
21
22
23
24
25
26
# 4. redis 查询结果

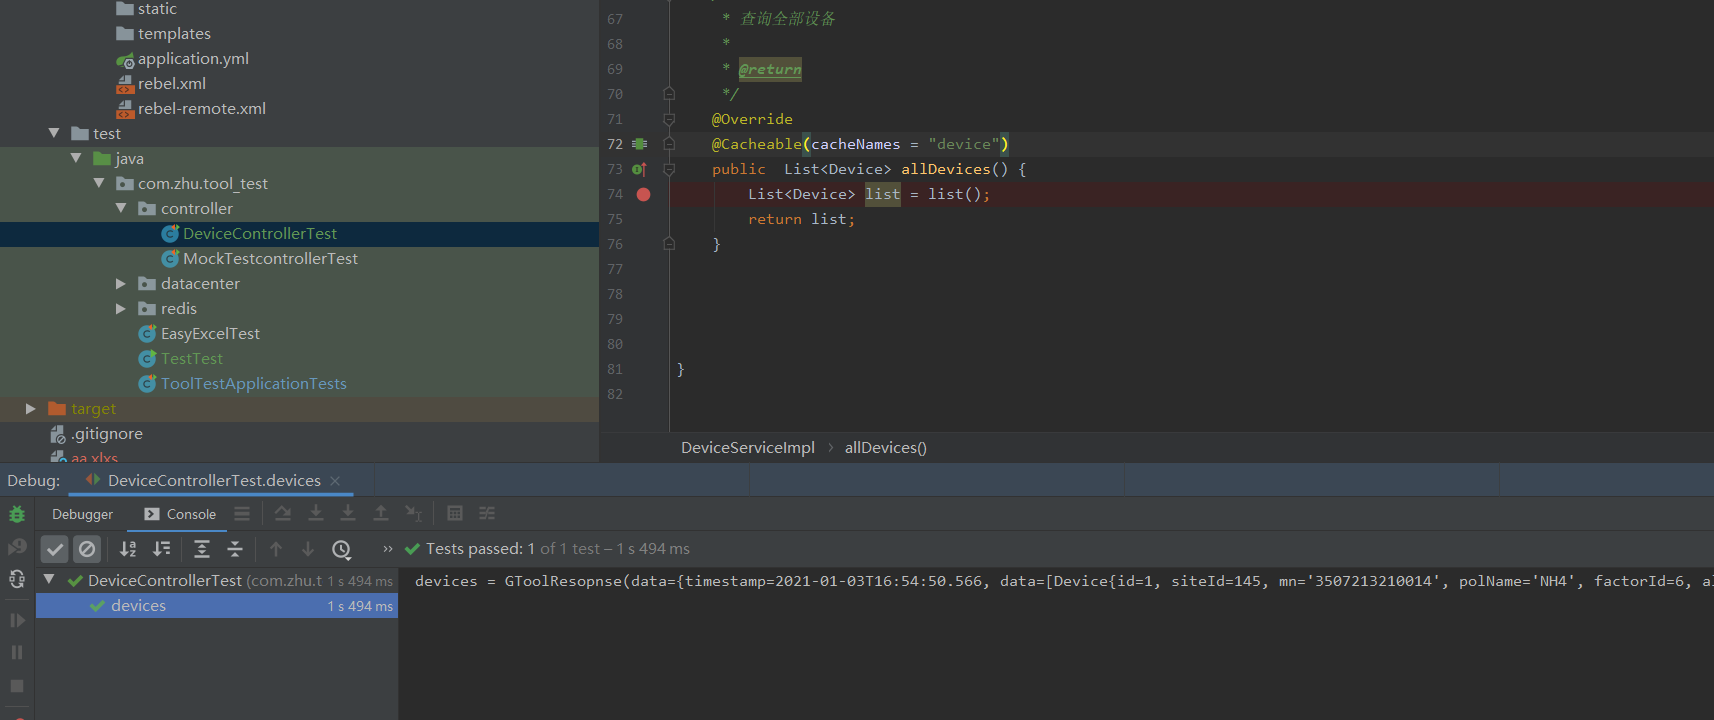
debug 模式 没有走 查询方法,说明只是把缓存的结果返回了